Raspberry Pi 4B Setup 2 - Gadget Mode
This post provides instructions on enabling USB gadget mode on the Raspberry Pi 4 Model B via Ethernet, allowing it to function as a network adapter connected to a computer using only a USB-C cable, without a monitor, mouse, or keyboard.
This document is based on:
- Windows 10 Home (22H2)
- Raspberry Pi 4 Model B 4GB
- Raspberry Pi OS (legacy, 64-bit)
- PuTTY v0.81 64-bit x86 Windows
- RealVNC Viewer 7.12.1 (r21) x64
- RealVNC Server 7.5.1
Introduction
This post provides a guide to enabling ‘gadget mode’ on the Raspberry Pi 4 Model B using only a USB-C cable, without requiring a mouse, keyboard, or monitor. The setup can be completed entirely from your computer. The Raspberry Pi 4B is chosen because it is the most powerful Raspberry Pi device capable of running the ‘legacy OS.’ Raspberry Pi 5 cannot install the legacy OS, which simplifies the process of enabling gadget mode. While it is possible to enable gadget mode on a Raspberry Pi 5, it requires additional peripherals (mouse, keyboard, and monitor) to modify /boot files.
Raspberry Pi 5 gadget mode discussions:
- RPi 5 USB gadget mode possible?: https://forums.raspberrypi.com/viewtopic.php?t=358573
- Pi 5 dwc2 overlay fails #77: https://github.com/raspberrypi/bookworm-feedback/issues/77
1. Modify boot files
The Raspberry Pi OS is not configured for ‘USB Gadget Mode’ by default. To enable it, some files in /boot or /bootfs must be modified.
Remove and reinsert the SD card into your computer if this step was not completed right after the OS installation.
You will see
/bootfsor/boot, which is accessible, and/USB Drive, which is not. This is normal on Windows, as it cannot read Linux-based file systems.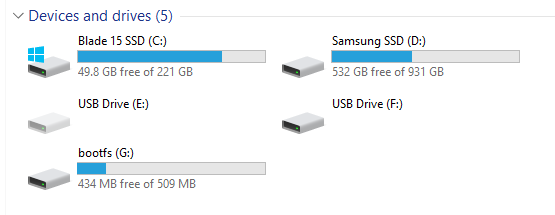 Two drives appear after the OS installation is completed on the microSD card.
Open the file
/bootfs/config.txtand add the following line at the end. Save and close the file.1 2
[all] dtoverlay=dwc2
What does
dtoverlay=dwc2mean?
DWC2 refers to the DesignWare USB 2.0 Core driver. which allows the Raspberry Pi to function as a USB gadget device.Open the file
/bootfs/cmdline.txt, and addmodules-load=dwc2,g_etherafterrootwait. Save and close the file.1
... rootwait modules-load=dwc2,g_ether ...
What does
g_ethermean?
g_etheris one of several emulation modes for the Raspberry Pi when DWC2 is enabled. USB Ethernet (g_ether) emulates a USB network adapter, allowing the Pi to appear as a network interface to a connected host computer. For the other USB gadget modules, please refer to Section A.1.Create a file named
sshin/bootfswith no extension and no contents.You can create this file by renaming a text file anad removing the
.txtextension using a text editor like VSCode.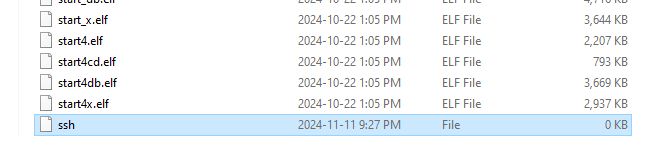 Creating the
 ssh
2. Connect RPi4B with a USB-C cable
Download Bonjour Print Services for Windows from the following link: https://developer.apple.com/bonjour/.
Bonjour Services is an application developed by Apple that improves USB communication between Windows and Linux-based computers. It allows you to use
ssh {username}@{hostname}.localinstead of an IP address.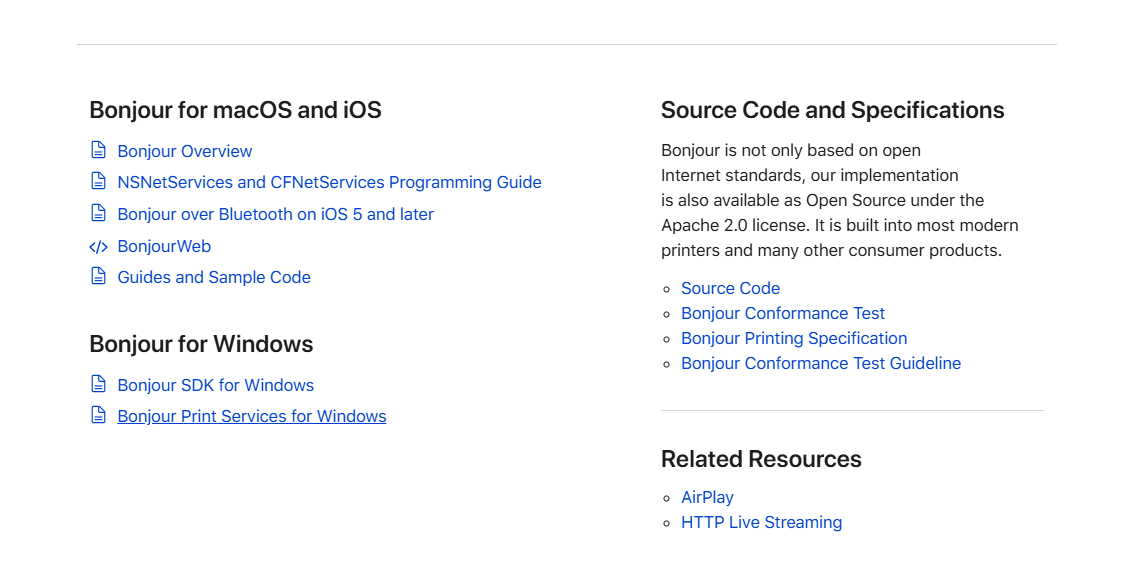 Bonjour Print Services for Windows download page
- Insert the microSD card into the Raspberry Pi.
- Ensure the card’s electrical contacts face the board.
- Connect the USB-C cable between the Raspberry Pi and your computer.
- A successful connection will cause the green LED on the Raspberry Pi to blink.
Open Device Manager on your computer and verify that “USB Ethernet/RNDIS Gadget” is listed under the “Network adapters” section.
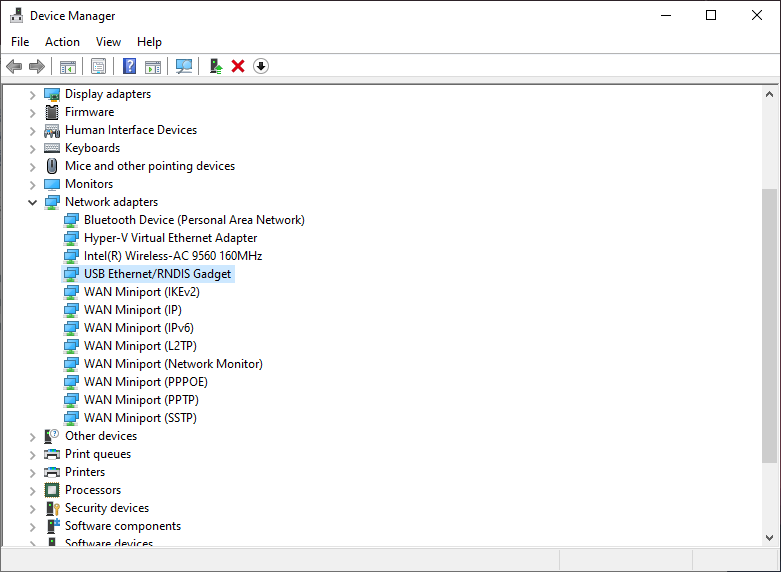 Successful detection of the device in Device Manager
If the device is detected under “Ports (COM & LPT)” instead of “Network adapters,” follow the instructions in Section E.1 to install the RNDIS/Ethernet Gadget driver.
3. Run SSH to control RPi4B
Secure Shell (SSH) is a protocol used to control and manage a remote machine from a client computer. It enables communication between your computer and the Raspberry Pi. For additional details on connecting to the Raspberry Pi remotely, refer to the YouTube video below.
You can use three methods to establish an SSH connection on Windows:
- OpenSSH Client, which enables SSH through Command Prompt.
- PuTTY, a third-party SSH application.
- VNC, which provides a graphical user interface (GUI) for remote access.
3.1. Using OpenSSH Client
OpenSSH Client is a built-in application that enables SSH through Command Prompt in Windows 10 and later versions. However, it must be installed manually. Follow the steps below to install the application:
- Go to Settings.
- Search for
Add an optional featurein the search bar. Look for OpenSSH Client.
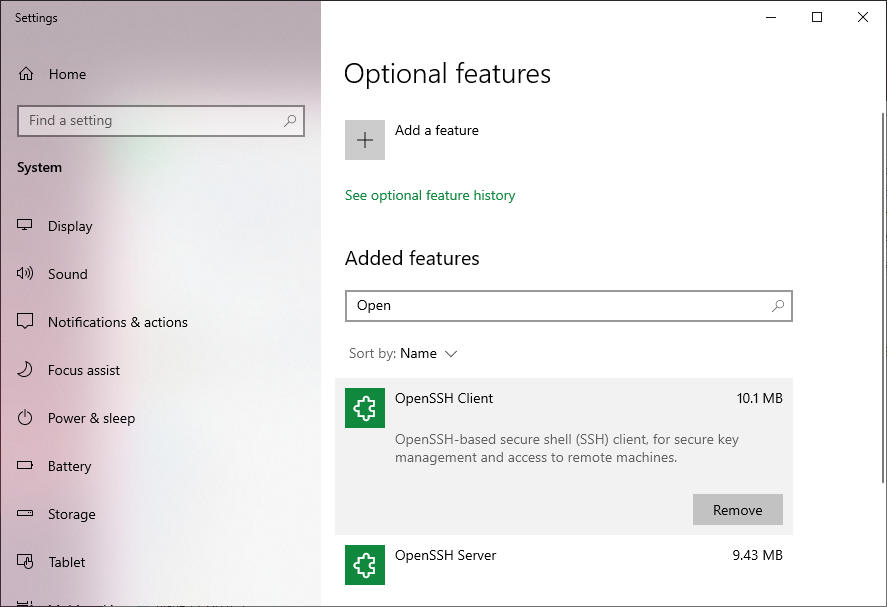 OpenSSH Client installation page in Settings
- Install it.
Once installed, follow these steps to use SSH:
- Open Command Prompt.
- Type
ssh {username}@{hostname}.local. - When prompted with “Are you sure you want to continue connecting (yes/no/[fingerprint])?”, type
yes. - Enter the password you set during the OS installation on the Raspberry Pi.
3.2. Using PuTTY
PuTTY is a popular third-party SSH application, especially for Windows users, offering extensive SSH management options.
- Download PuTTY from the official website: https://www.putty.org/. Alternatively, you can install it from the Microsoft Store.
- After installation, open PuTTY.
- In the “Host Name (or IP address)” field, type
{hostname}.localas configured during the OS setup. Ensure the port is set to
22and the connection type isSSH.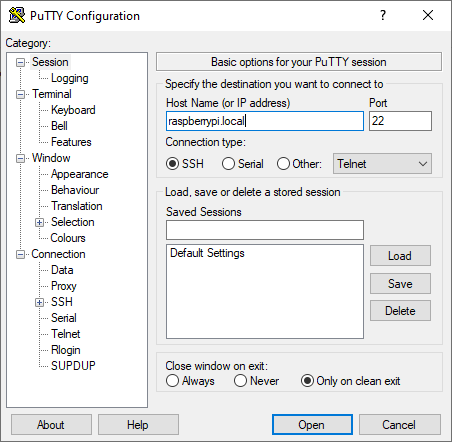 Configuration page in PuTTY
- Click “Open.”
- When prompted with “login as:”, enter
{username}. Enter the password you set during the OS installation on the Raspberry Pi.
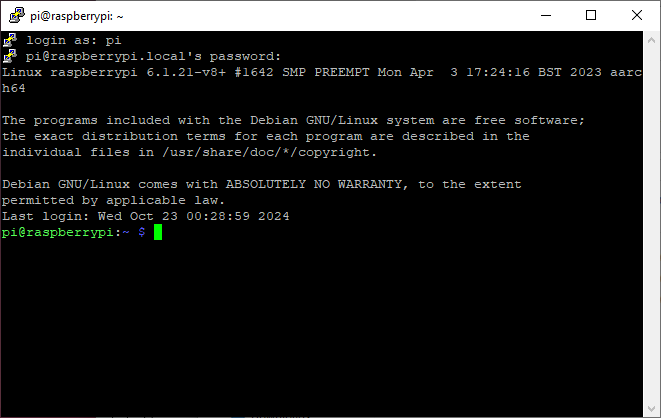 Successful login prompt in PuTTY
3.3. Using VNC
Virtual Network Computing (VNC) is a protocol that provides a graphical user interface (GUI) while maintaining an SSH connection. It offers a complete remote control experience.
To use VNC, the Raspberry Pi OS must support a graphical UI. This excludes Lite OS versions.
3.3.1. Enabling VNC mode on the Raspberry Pi
Before using VNC, enable the VNC mode on the Raspberry Pi by accessing its configuration via SSH (refer to Section 3.1 or 3.2).
- Connect to the Raspberry Pi via SSH.
Run the command:
sudo raspi-config.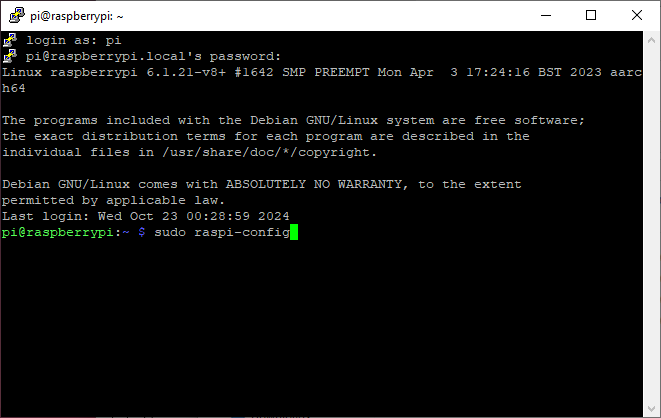 Raspberry Pi configuration prompt in PuTTY
- In the “Raspberry Pi Software Configuration Tool (raspi-config)” menu, navigate to “Interface Options.”
Use ↑ and ↓ keys to navigate and press Enter to select. Use ← and → to switch between “<Select>”, “<Back>”, and “<Finish>”.
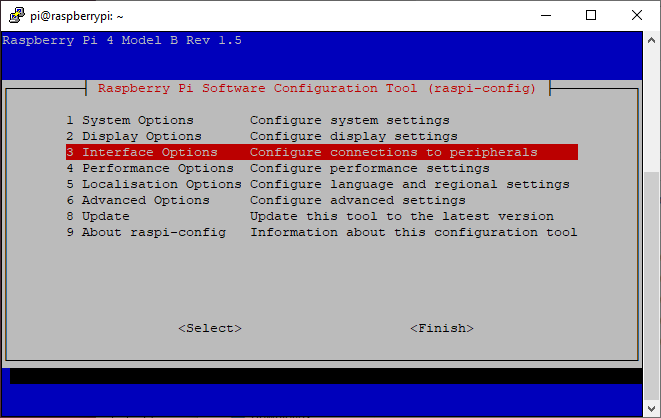
raspi-configmenu page Select “VNC.”
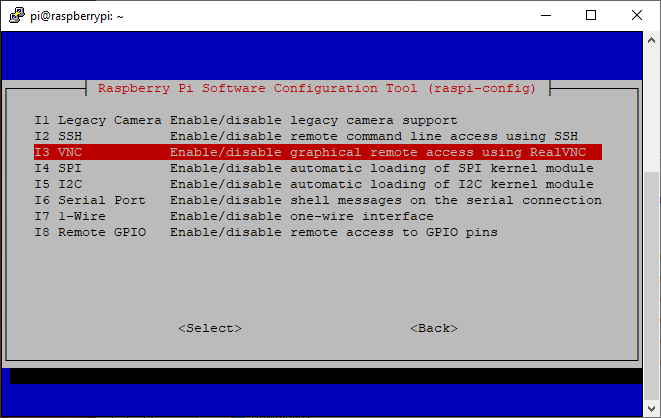
raspi-configinterface options pageWhen prompted, “Would you like the VNC Server to be enabled?”, select “<Yes>.”
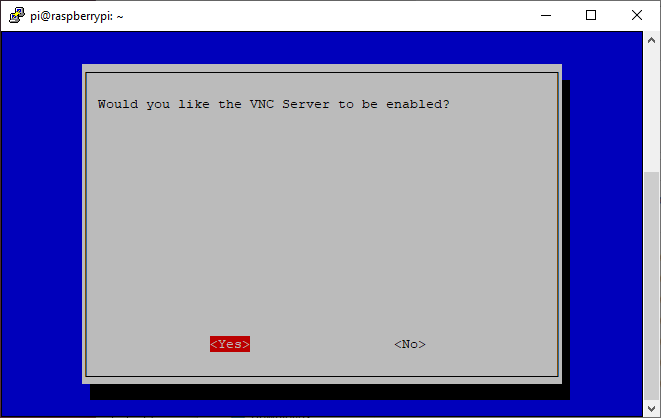 Enabling VNC mode
- Select “<Finish>” to return to the terminal.
- Restart the Raspberry Pi.
3.3.2. Using RealVNC Viewer
Once VNC mode is enabled, use the RealVNC Viewer client to connect.
- Download RealVNC Viewer from the official website: https://www.realvnc.com/en/connect/download/viewer/. Alternatively, install it from the Microsoft Store.
Open the application. You do not need to log in. Close the login window and enter the VNC server address (either the IP address or
{hostname}.local).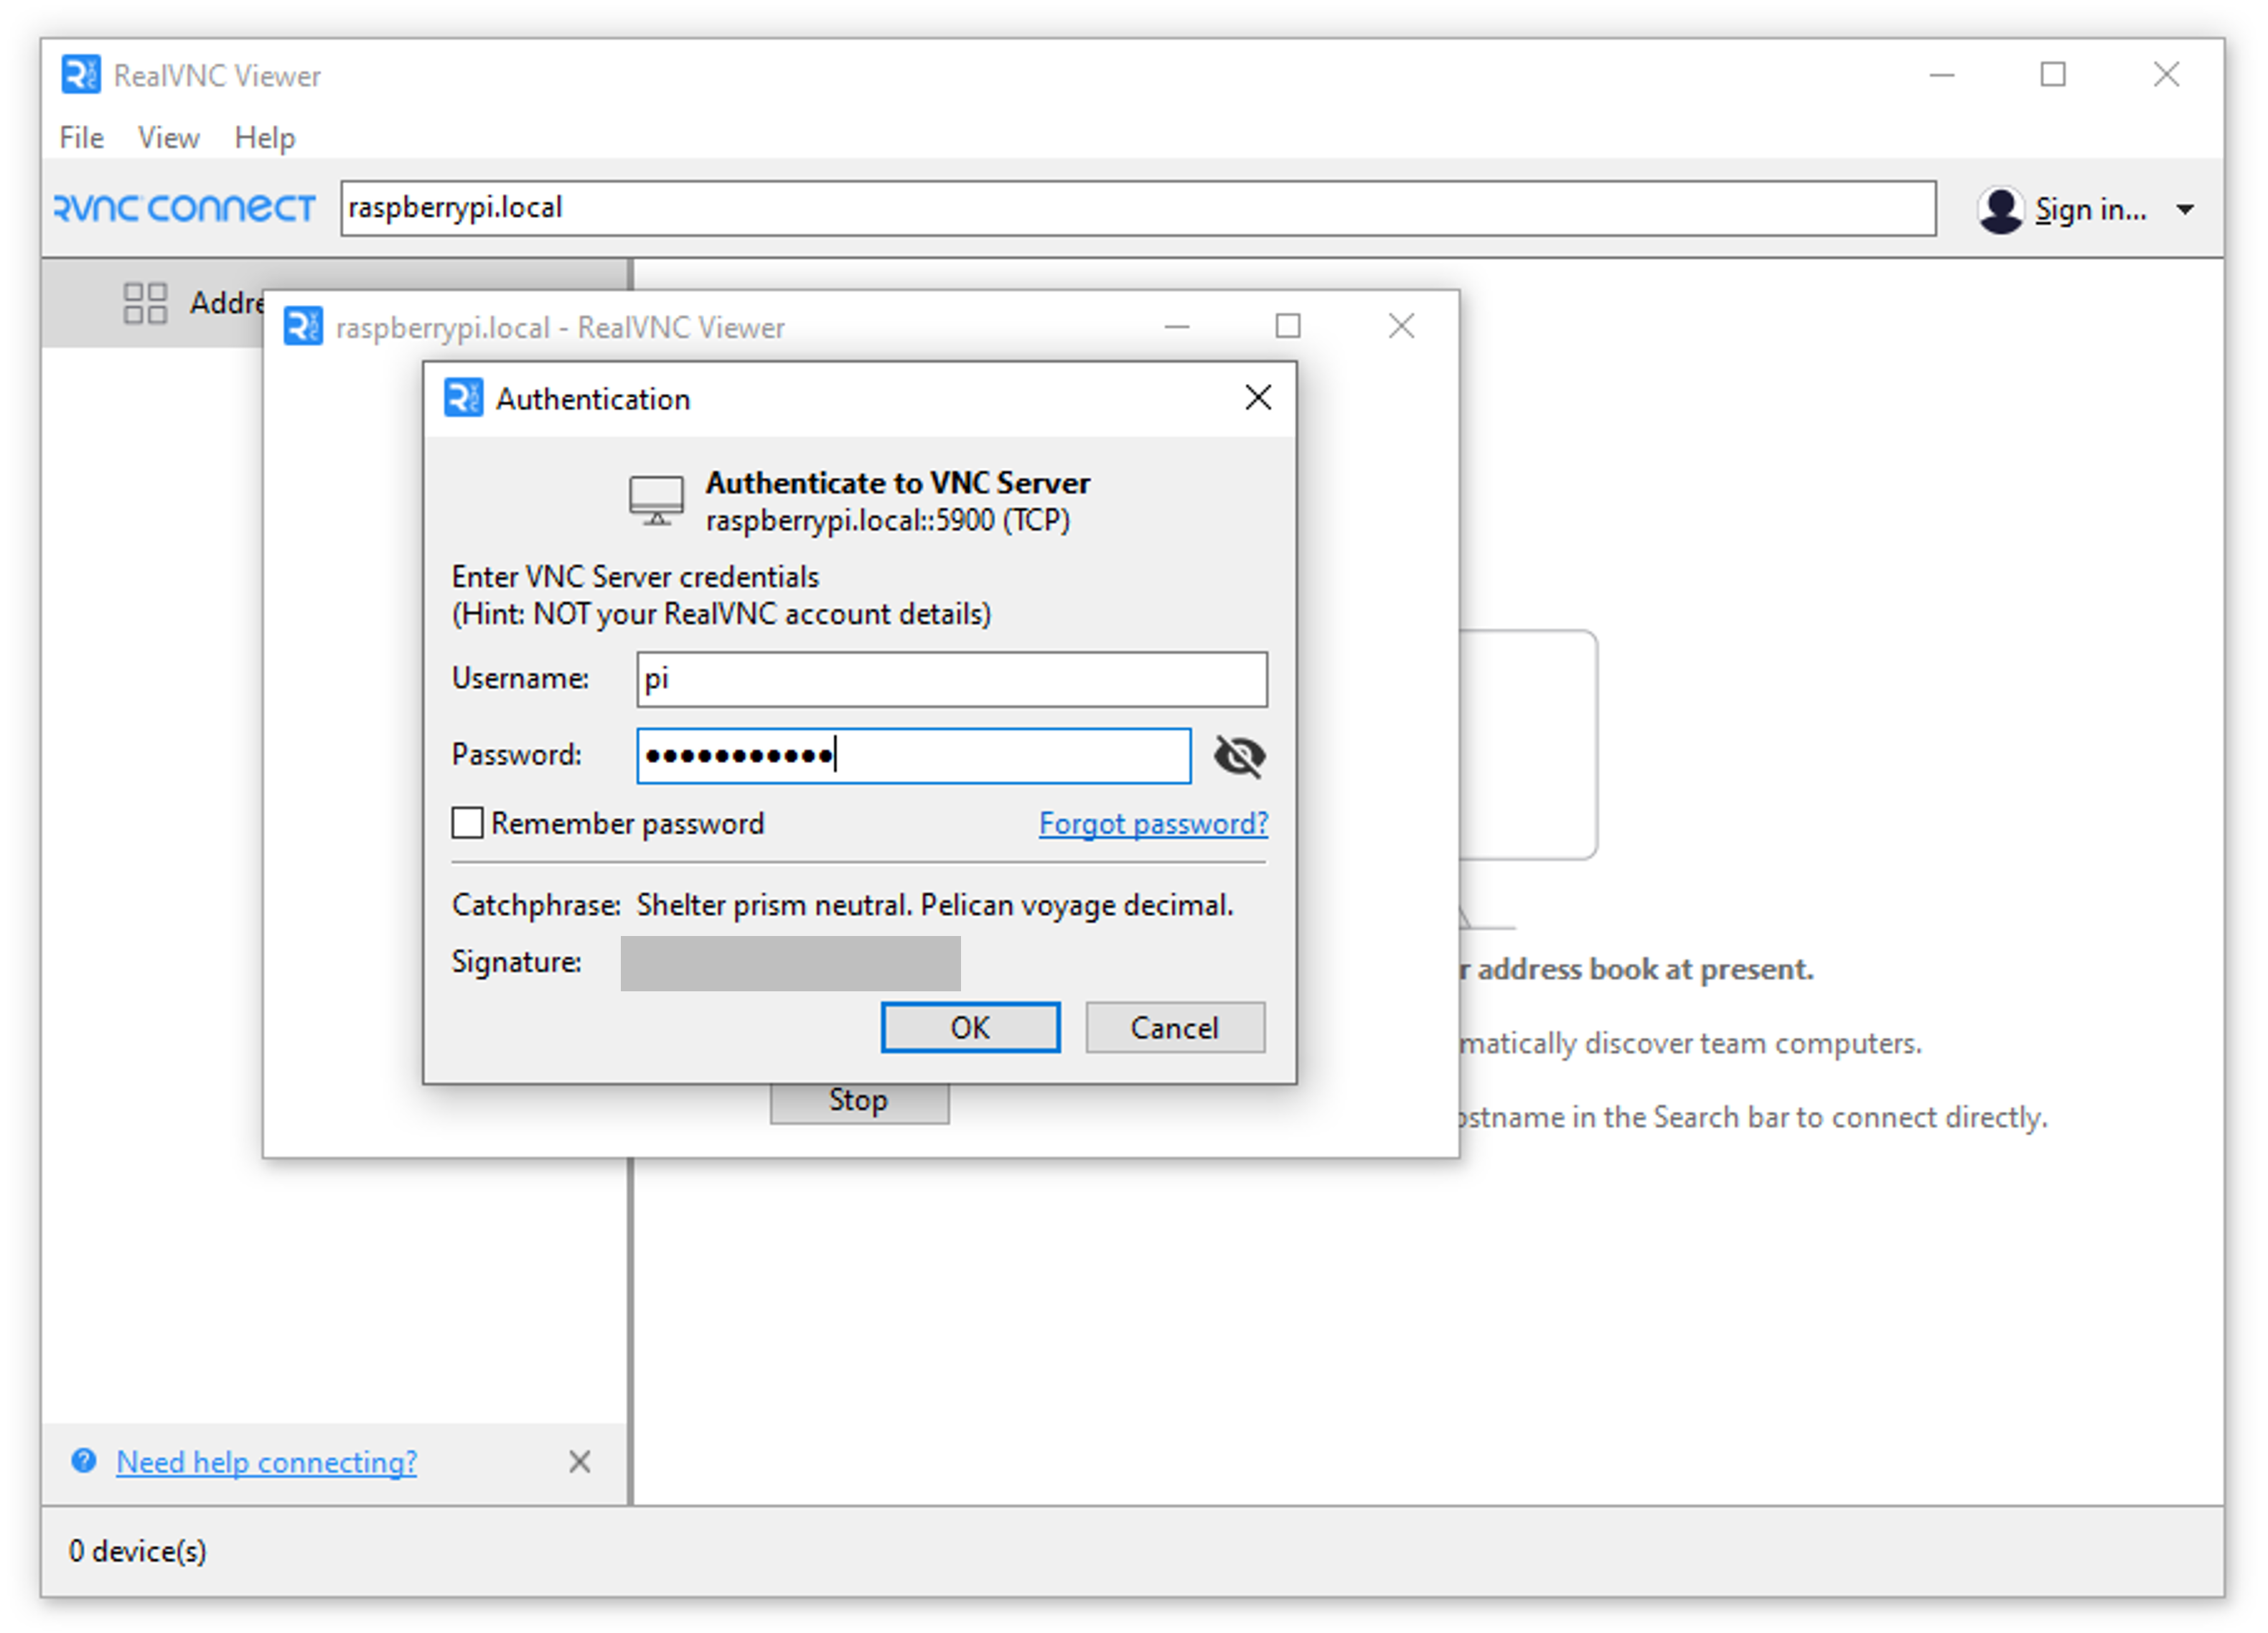 RealVNC Viewer interface
- Enter the username and password. Click “OK” to start.
The Raspberry Pi desktop will appear, and the address will be saved in the address book.
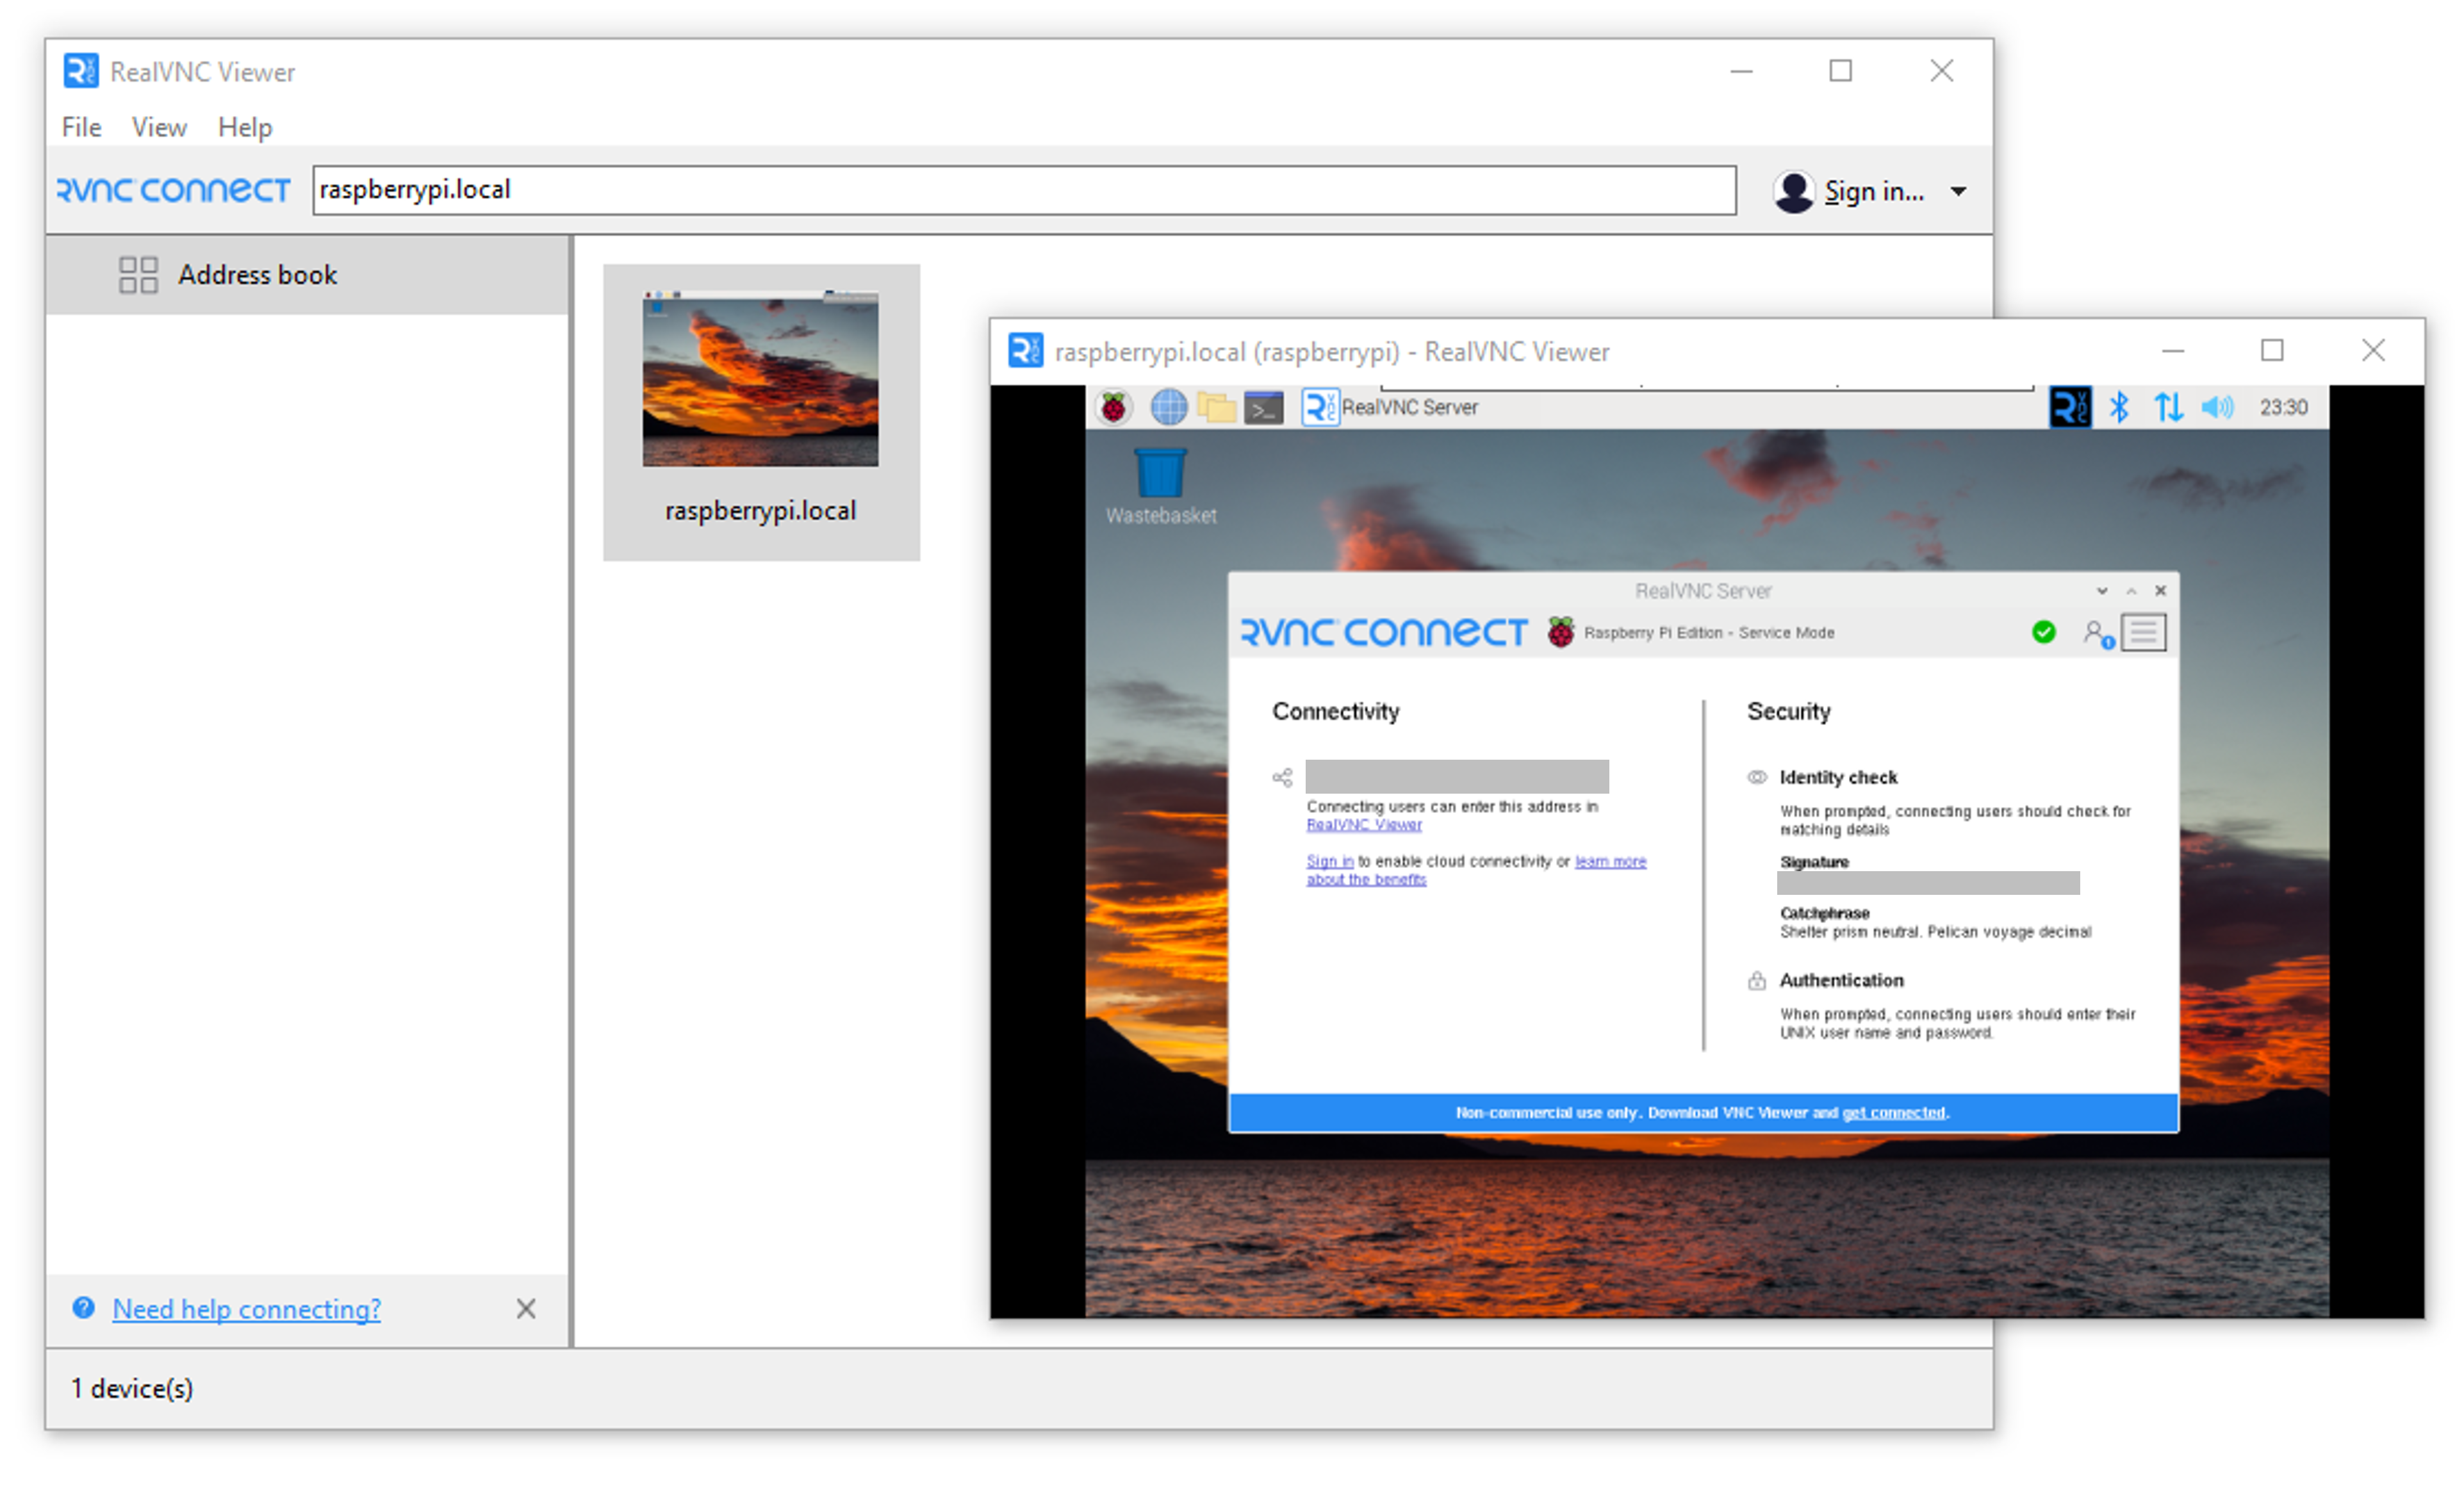 RealVNC Viewer when connected
3.3.3. Adjusting Resolution
If the resolution is unsatisfactory, adjust it through the Raspberry Pi configuration menu (raspi-config).
- On the Raspberry Pi desktop, click the Raspberry Pi icon in the top-left corner.
- Navigate to “Preferences” > “Raspberry Pi Configuration.”
Select the “Display” tab and choose your preferred “Headless Resolution.”
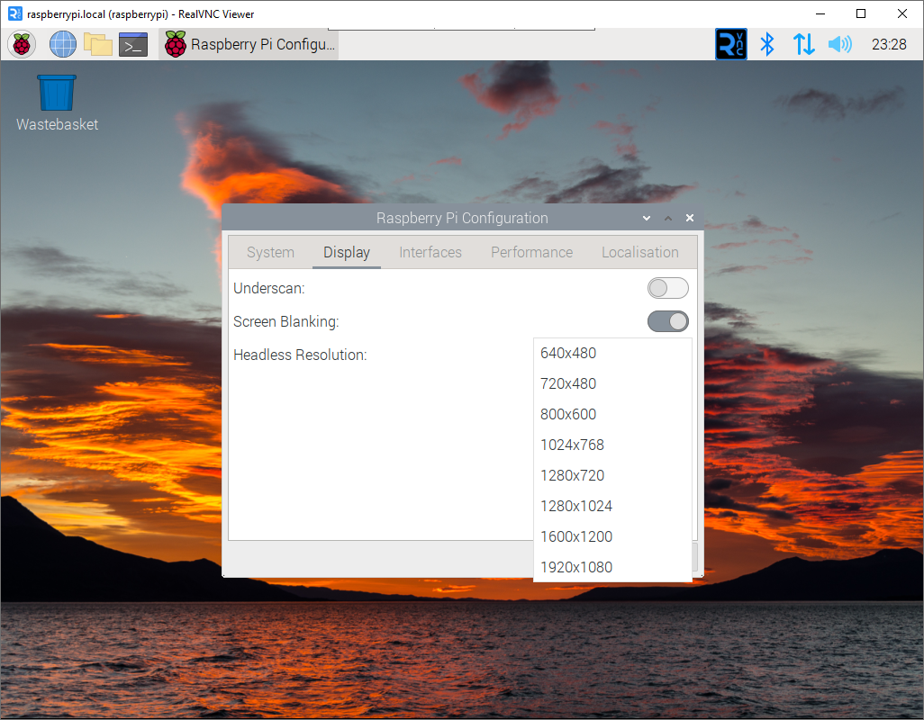 Adjusting resolution through the GUI
If you encounter the error
Cannot currently show the desktop, resolve it by manually setting the resolution through the Raspberry Pi configuration menu. See Section E.2 for more details.
A. Appendix
A.1. Common USB gadget modules
g_etheremulates a USB Ethernet adapter, allowing network communication between the device and the host. It is used for networking between the Raspberry Pi and a host such as via SSH over a USB cable.g_serialemulates a USB-to-serial converter, enabling serial communication like a COM port. It is used for debugging or controlling the Raspberry Pi via serial connection.g_mass_storageemulates a USB flash drive or external storage device, making the device appear as a storage medium to the host. It is enabled when sharing files with a host by emulating a USB flash drive.g_hidemulates a USB Human Interface Device (HID), such as a keyboard, mouse, or joystick.g_audioemulates a USB audio device, such as a microphone or speaker. It is used to utilize the Raspberry Pi as a USB microphone or speaker.g_webcamemulates a USB Video Class (UVC) device, making the device appear as a webcam. It is enabled to stream video from the Raspberry Pi’s camera module as a USB webcam.g_midiemulates a USB MIDI device, allowing the device to act as a musical instrument interface. It is used when connecting the Raspberry Pi to a MIDI-compatible musical instrument.g_multicombines multiple functionalities (e.g., Ethernet + mass storage or Ethernet + serial).g_acm_mscombines serial (ACM) and mass storage.g_ncmemulates a USB Ethernet device using the NCM protocol, which is faster than RNDIS.g_cdcemulates a CDC Ethernet device, providing an alternative USB networking.
E. Error Notes
E.1. Device is detected under the “Ports (COM & LPT)” tree
On Windows 10, the Raspberry Pi device might not be recognized as an Ethernet gadget and may instead appear as a USB device under “Ports (COM & LPT).” This issue can be resolved by installing the RNDIS/Ethernet Gadget driver1.
- Download the RNDIS driver from this link: https://modclouddownloadprod.blob.core.windows.net/shared/mod-duo-rndis.zip.
- Alternatively, use this file link: RNDIS/Ethernet Gadget
- Extract the
mod-duo-rndisfolder from the.zipfile. - Open Device Manager and navigate to “Ports (COM & LPT).”
- Expand the section and locate the detected “USB Serial Device.”
- Right-click the device and select “Update Driver Software.”
- Choose “Browse my computer for driver software.”
Browse to the extracted folder,
mod-duo-rndis, and ensure “Include subfolders” is checked. Browsing
 mod-duo-rndisin the driver updater- In Device Manager, click “Action” > “Scan for hardware changes.”
- Verify that “USB Ethernet/RNDIS Gadget” now appears under the “Network adapters” section.
E.2. RealVNC Viewer Error: Cannot currently show the desktop
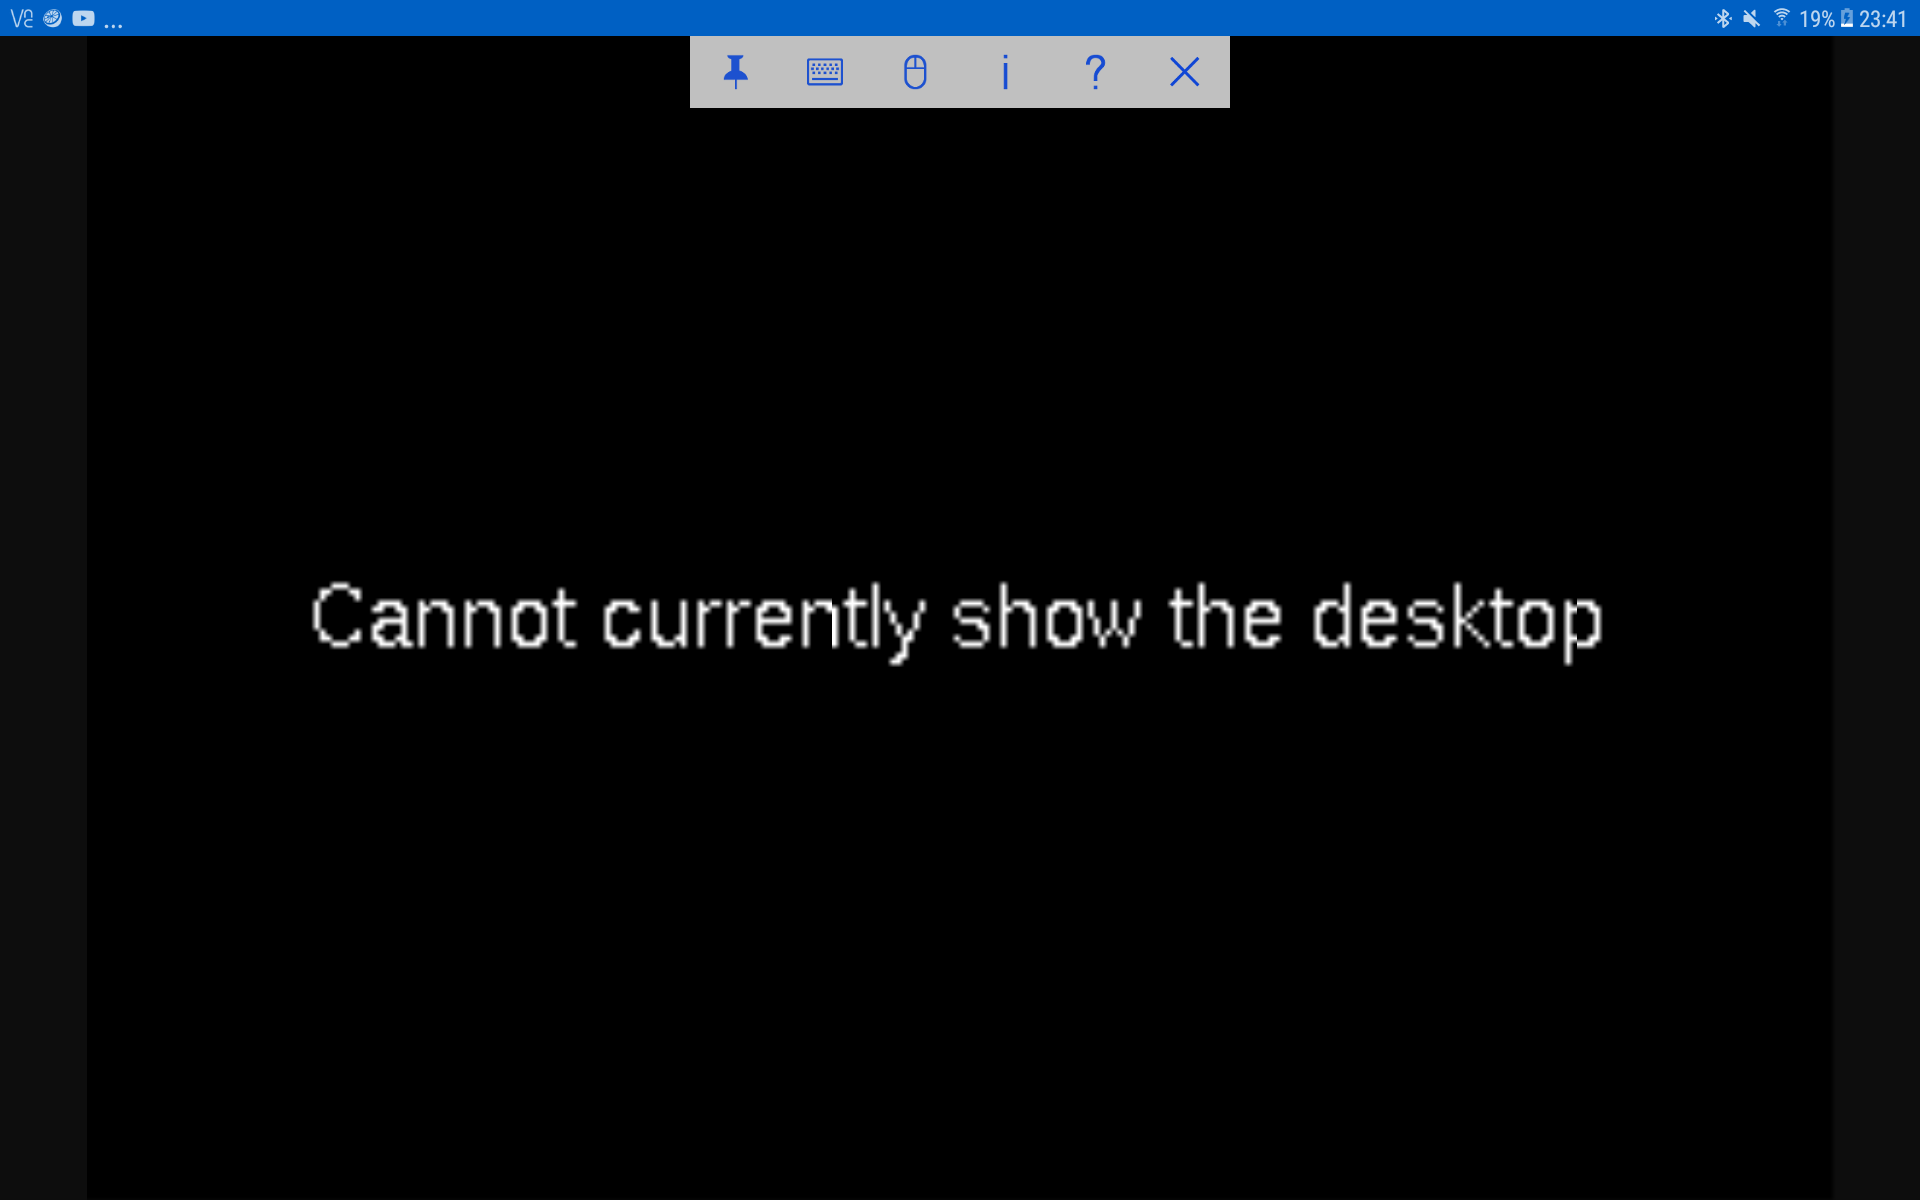 RealVNC Viewer error when the Raspberry Pi desktop cannot be displayed. Referenced from a Raspberry Pi forum discussion2.
This error often occurs when no HDMI monitor is attached. Manually setting the display resolution resolves the issue.
- Connect to the Raspberry Pi using a terminal interface via OpenSSH or PuTTY.
- Open the Raspberry Pi configuration menu by entering the command:
sudo raspi-config. Navigate to “Display Options.”
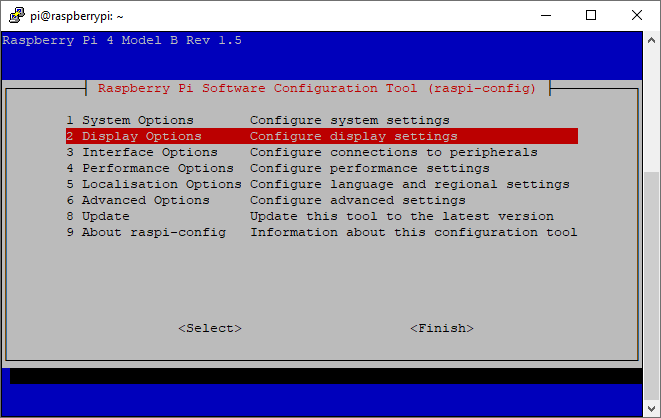
raspi-configmenu pageSelect “VNC Resolution.”
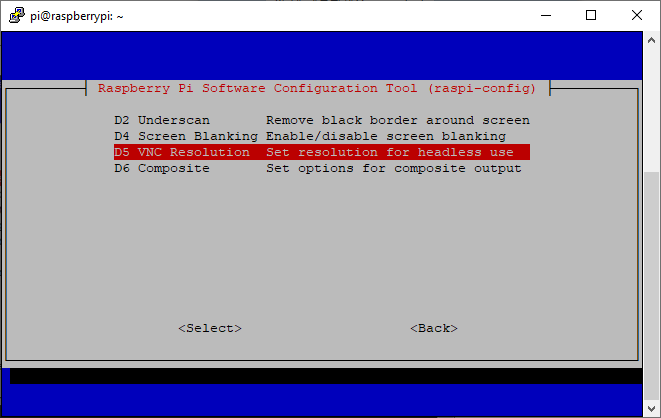
raspi-configdisplay options pageChoose your preferred resolution.
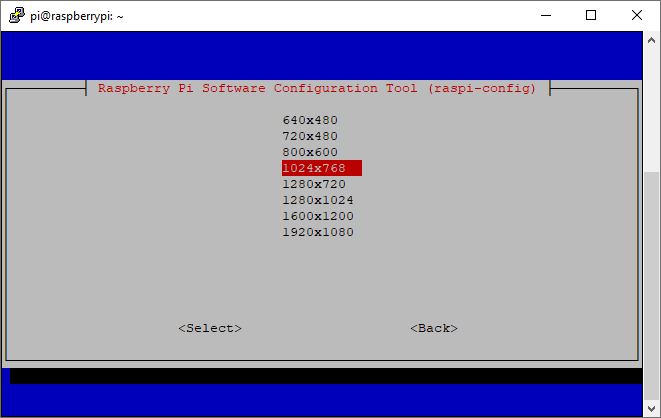 Adjusting VNC resolution
- Reboot the Raspberry Pi.
Useful Links
Turning your Raspberry Pi Zero into a USB Gadget
How to Set Up a Headless Raspberry Pi, Without Ever Attaching a Monitor
Raspberry Pi Zero USB/Ethernet Gadget Tutorial